
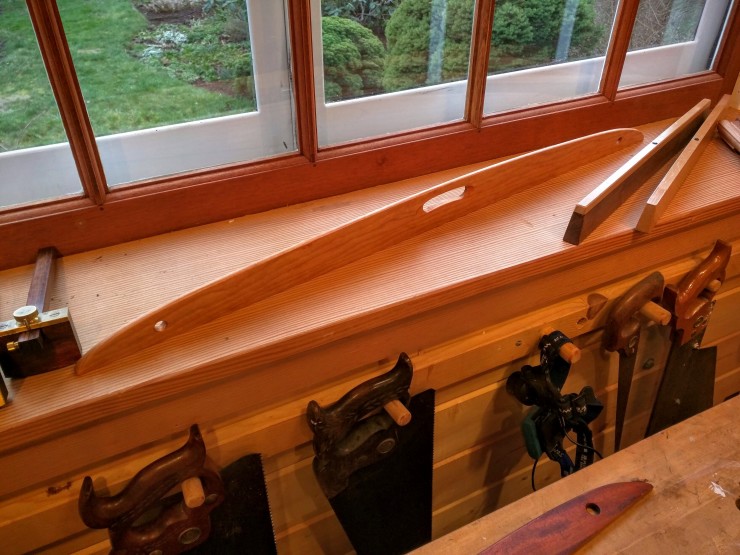
Here’s how I go about selecting and conditioning wood for a wooden straight edge that will best maintain its accuracy over a period of time:
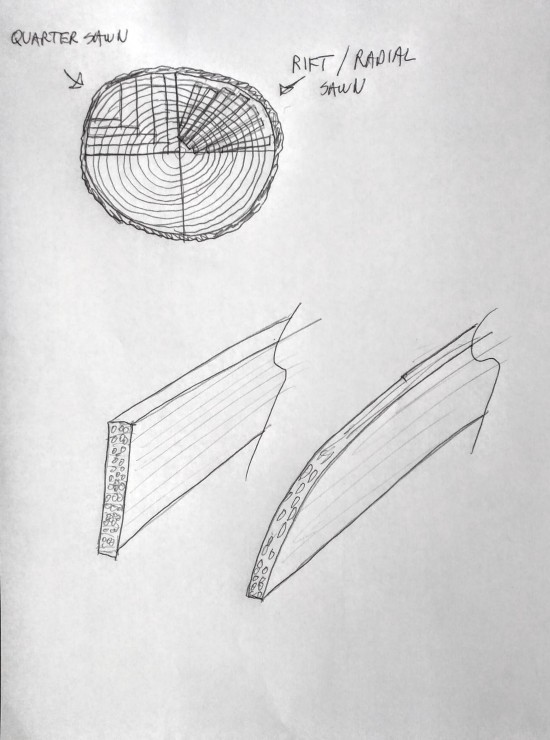
To begin with I select my stock from the more stable wood species. Generally less-dense woods will be more stable, but there are numerous exceptions. Mostly I go with Honduras mahogany and cherry. There is a good chart at the flooringhardwood.com website (under “resources”) that lists dimensional change coefficients for many common hardwoods. The measurements refer to a plain sawn board–be aware that a rift-sawn (sometimes called radial cut) usually has about one-half less dimensional change.
Therefore, to reduce inherent tendencies to movement I always cut my stock from rift sawn true radial (not just from the quarter sector) grain orientation. Notice the difference in the illustration. Rift sawn gives you what riven wood (split with wedges and froes) would produce.
After I cut the stock to length and resaw it to rough thickness (I’m usually at three-eighths of an inch) I condition these workpieces by standing them on edge for several weeks (in the same environmental conditions as the place/shop they will live out their lives). Avoid laying them flat and stickering them–you want to see them move so you can cull out warped and bowed stock.
I always work a taper or curve to the top edge and taper the thickness from bottom to top. This lightens the tool (reducing the chance of it dinging other wood components being tested) and adds stability (lowers center of gravity) when setting it on its edge to take a reading. The taper or curve also may help reduce potential for movement due to ambient moisture levels because it exposes more end grain surface area–Notice in the illustration that the exposed cells present circular cross sections in a typical cross cut, but are ovular in curved or tapered cuts. The ovular cross sections allow the wood to react more quickly to adjust (and re-adjust) to the environment. In theory anyway. This may not be a factor for wood with finish on it, however.
Speaking of finish, I hand rub slow-drying oil into the wood. I use tung oil with non-toxic dryers. (I’m a big fan of Bioshield furniture finishes). I add enough coats to thoroughly saturate the pores. After the last coat, when dry (takes a couple of days), I apply several coats of shellac. Shellac provides an excellent vapor barrier, more so than most other film finishes.
To test (and occasionally retest) the finished tool for straightness I use the magic of geometry: I draw a line to its edge and then flip it over and draw a second line on top of the first. If there is no variance, the edge is perfectly straight.
Keep tuned: Further down the digital road we’ll be posting a short video clip on how to make a straightedge to precision tolerances of .001 inches using a hand plane.


5 thoughts on “Let’s Get This Straight”
Justin
Nooo!!!! Not you too, Jim! The term “riftsawn” is the most confused term in all of woodworking. For a decade, I only knew this term as the widely acknowledged cut of wood in which the growth rings are at a 45° angle to the surfaces when viewed from the end grain. Then in the last few years, a proliferation of diagrams have appeared on the web, ostensibly showing “riftsawn” wood perfectly radial-cut lumber. But the websites that host these images are in contradiction with themselves! For example, on this website [http://www.hardwooddistributors.org/blog/postings/what-is-rift-sawn-lumber/] they show the radial cutting pattern, but the example that they use is clearly NOT radial, but rather what I learned as riftsawn so many years ago. I can’t speak to which use of the term has longer historical precedent, but given the widespread confusion, can’t we just unambiguously refer to the wood as “radial” and drop the term “riftsawn” altogether? (Although that still leaves us with the unresolved problem of what to call the 45° growth ring wood.)
Jim Tolpin
Wiki says rift sawn is the same thing as radial sawn. Which makes perfect sense to me as both riven and rift are derivations of “to split”. Which, of course, is what typically and historically produces sectors of the log—which are, or course, radial.
DickCulp
VG fir seems to be quite stable. Is there any reason NOT to use VGF?
Jim Tolpin
None that I can think of. I recommend old growth (tight grain) as it works much easier.
ant11sam
That video would be great.
Because your videos usually are “idiot proof”
And could help some other people that have a different mother language then English!